
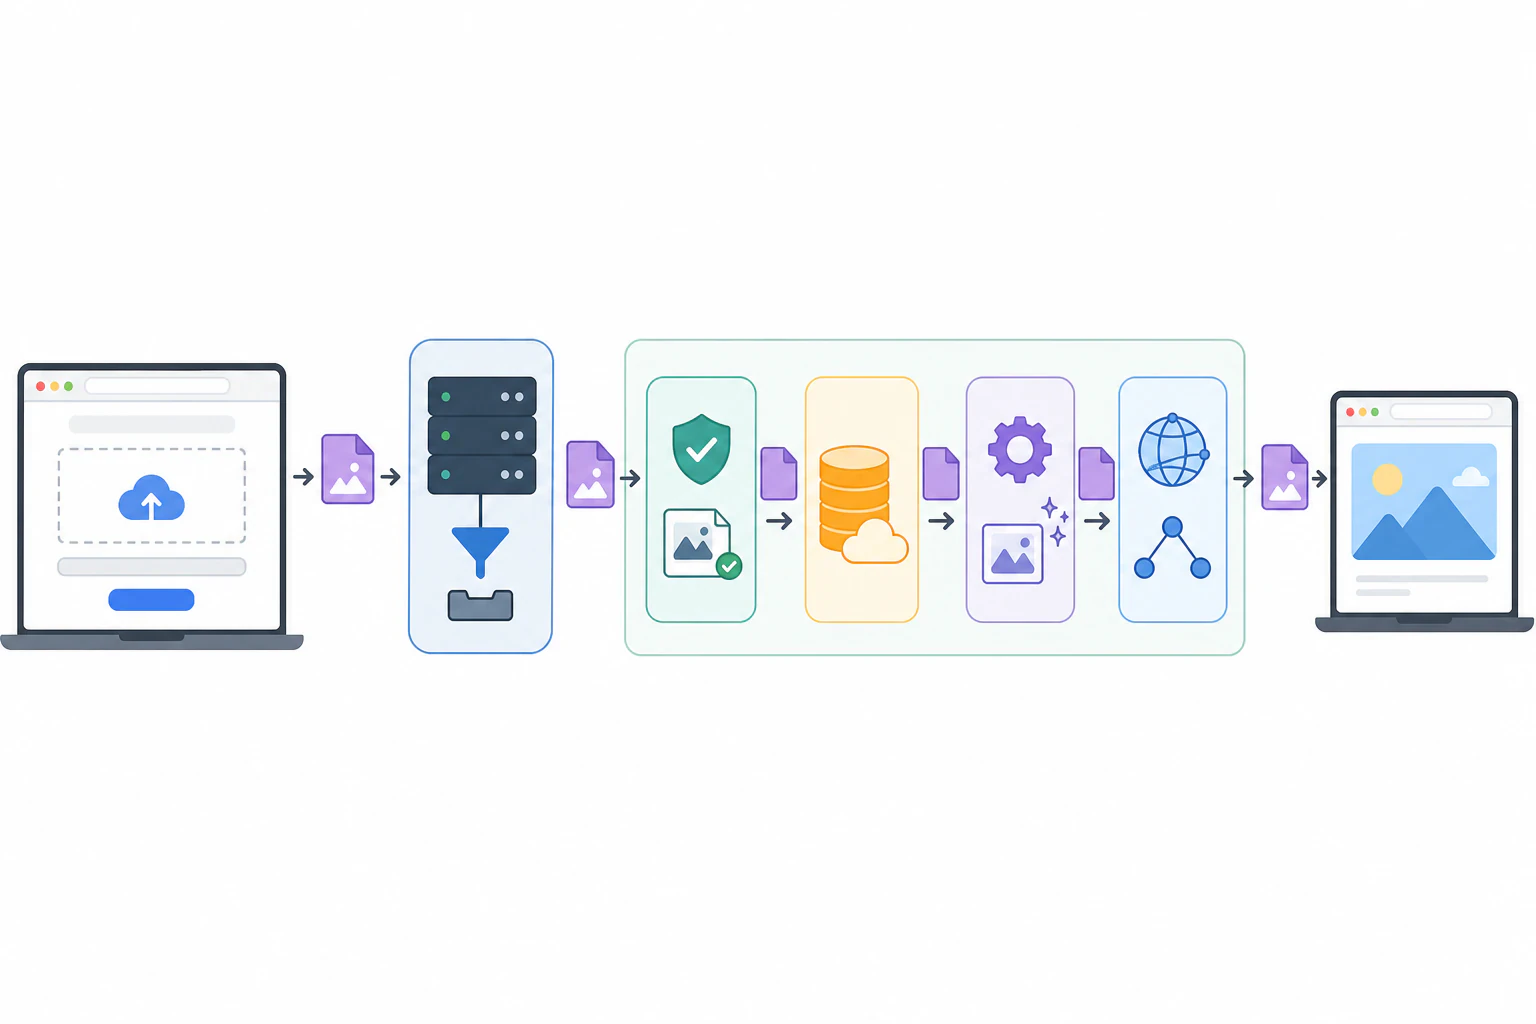
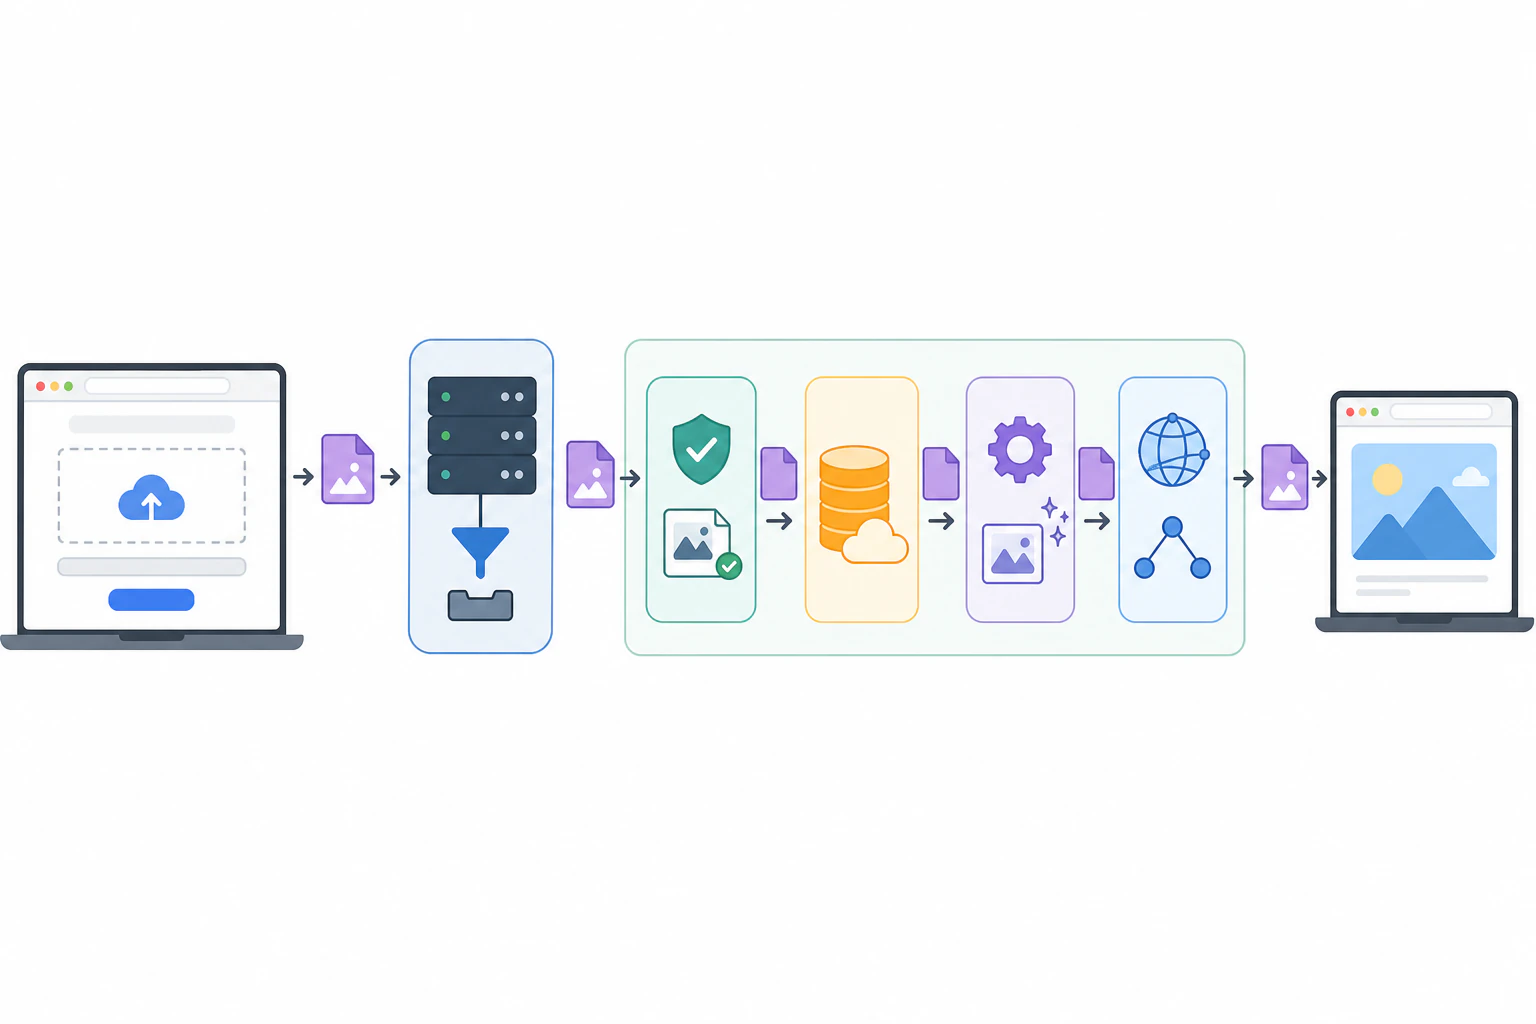
Three attributes do the work, the other 90 percent is the backend.
A working file upload form is one form element with the right attributes: method="post" so the files travel in the request body instead of the URL, enctype="multipart/form-data" so the browser encodes the raw bytes correctly, and an <input type="file"> for the picker. Get those three right and the browser hands your server a file. That part takes about five lines. What almost nobody tells you up front is that the form is the easy 10 percent. The hard 90 percent starts the moment the file lands on your server: validating it, storing it somewhere safe, resizing and compressing it, and serving it back fast. This walks through both halves honestly, and where a hosted endpoint saves you from writing the second one.
Here's the whole front end. Drop this into any HTML page and it will collect a file:
<form action="/upload" method="post" enctype="multipart/form-data">
  <label for="doc">Choose a file</label>
  <input type="file" id="doc" name="doc" accept="image/*,.pdf" required>
  <button type="submit">Upload</button>
</form>
Miss any one of the three load-bearing pieces and it breaks in a way that's annoying to debug. Forget enctype="multipart/form-data" and the browser sends only the filename as plain text, not the file, so your server sees an empty upload with no error. Leave it as the default method="get" and the file can't ride in a query string at all. The name attribute is how your backend addresses the file ($_FILES['doc'] in PHP, req.files.doc in a typical Node setup), so a missing or mismatched name means the file arrives and you can't find it.
The knobs on the picker that actually matter.
The <input type="file"> element has a handful of attributes worth knowing. Most tutorials list them; here's what each one really buys you.
- accept filters the file picker to the types you want, as MIME types or extensions:
accept="image/*",accept=".jpg,.png,.pdf",accept="video/*". Treat it as a convenience for the user, not a rule. It's a hint that grays out other files in the dialog, and any determined visitor can pick "all files" and send you a.exerenamed to.jpganyway. - multiple lets someone select several files at once from the picker. Your backend then receives an array under that
nameinstead of a single file, so remember to loop over it. - required stops the form submitting empty, so you don't process a request with nothing attached.
- capture is the mobile one people forget:
capture="environment"tells a phone to open the rear camera directly instead of the file browser, which is exactly what you want for a "photograph your receipt" flow. - The label matters. Wiring
<label for="doc">to the input'sidisn't decoration; it's what makes the picker keyboard-accessible and readable to a screen reader. A bare input with no label is a real accessibility bug.
Want the file list without a page reload, or a progress bar, or a preview thumbnail? That's the File API in JavaScript. Read input.files, which gives you a FileList of File objects, each with .name, .size (in bytes), and .type. You can check size client-side before uploading, render a preview with URL.createObjectURL(), and POST with fetch() and a FormData object so the page never navigates away. It's genuinely nice UX, and it's also entirely optional. The plain form above works with JavaScript disabled.
Client-side checks are for the user's convenience. Server-side checks are the only ones that keep you safe.
What has to happen once the file lands.
The five-line form ends here. Everything below is the receiving end, and it's where "add a file upload" quietly turns into a small infrastructure project.
Validate it for real
Re-check the type on the server by sniffing the actual bytes, not by trusting the extension or the browser-sent MIME type, both of which lie. Enforce a real size cap (your server config has its own limit too, PHP's upload_max_filesize and post_max_size being the classic silent culprits). Reject anything that isn't what it claims to be. This is the step that stops a "profile photo" field from becoming a way to upload a web shell.
Store it somewhere sane
Not in your webroot, or a malicious upload becomes a directly executable URL. Give every file a unique, unguessable name so two visitors named IMG_0421.jpg don't overwrite each other, and so nobody enumerates your uploads by counting. For anything past a hobby project that means object storage like S3, which then means bucket policies, IAM, and CORS. This is the step that turns into an afternoon.
Process the image
Nobody wants the 42MB HEIC straight off an iPhone served to every visitor. Real handling means resizing to sane dimensions, converting to WebP, and compressing, ideally at upload time so you store the optimized version. Doing this yourself is a pipeline: an image library, a queue for anything heavy, and error handling for the file that isn't the format its extension swore it was.
Serve it back fast
A file sitting on your origin server, streamed through your app on every request, is slow and expensive. In practice you want it on a CDN so it's delivered from an edge near the visitor. That's another service to wire up, point a domain at, and keep in sync with whatever you deleted from storage.
None of those four is exotic, and you can absolutely build all of them. Plenty of teams do, and if you genuinely need full control over storage and processing, raw S3 plus a Lambda pipeline plus CloudFront is the honest right answer and the cheapest at scale. But be clear-eyed that "add a file upload form to my site" and "stand up a validating, deduplicating, image-processing, CDN-backed upload service" are different sizes of job, and the tutorial that showed you the five-line form quietly conflated them.
When you want the upload without owning the pipeline.
If the four cards above sound like more than you signed up for, the alternative is to point the form at a hosted endpoint that already does them. That's the category Tonta sits in.
Tonta is upload infrastructure you add with a single script tag. Instead of writing and hosting the receiving end, you drop an element and a script on the page, and it renders an uploader that POSTs to a hardened endpoint Tonta runs. Resize, WebP conversion, and compression happen on the way in; files come back served from a CDN. There's no bucket, no signed-URL logic, and no processing pipeline for you to build or babysit. The whole embed is this:
<div class="my-uploader"></div>

<script src="https://tonta.io/uploader/uploader.js"
        data-backend="https://tonta.io/uploader/upload.php"
        data-target=".my-uploader"
        data-api-key="YOUR_API_KEY"
        data-callback="handleUpload"></script>
A successful upload calls your callback with JSON that already includes the optimized, CDN-hosted versions, so you get back a URL you can use immediately rather than a raw file you still have to process:
{
  "success": true,
  "id": "aX9f2...",
  "link": "https://files.tonta.io/aX9f2.jpg",
  "versions": [
    { "label": "Web", "url": "https://files.tonta.io/aX9f2_1920.webp",
      "dimensions": "1920x1280", "format": "webp" }
  ]
}
The API key is domain-locked: each key is tied to the domains you list, and a request from an origin that isn't on the list gets a 403 Domain not allowed. That's origin restriction, worth being precise about. It keeps a copied key from working on some random site, but it isn't a full user-auth or per-user permission system, so don't reach for it as one. If you need people to upload without any account at all, say collecting files from clients or event guests, you can flip an uploader into a shareable drop page and just hand out the link.
Rolling your own backend
Total control, and you own every part of it.
- ✓ Complete control over storage, processing, and cost; cheapest at real scale on raw S3
- ✓ No third party in the data path, which some compliance situations require
- × You write and maintain validation, dedup, resizing, CDN wiring, and CORS yourself
- × The security mistakes (executable webroot, MIME trust, public bucket) are yours to make
Tonta
A hardened endpoint from one script tag.
- ✓ No backend to write: validation, storage, resize/WebP/compression, and CDN delivery are built in
- ✓ Domain-locked API keys, plus shareable drop pages for account-free collection
- ✓ Real free tier: 5GB and one uploader, no card, with resize and WebP included
- × No official language SDKs (script tag, fetch, and cURL), and a narrower surface than Cloudinary or Filestack; free tier is a single uploader
The line I'd draw: if the upload is the point of your product, or you have the ops budget and a real reason to own the pipeline, build it. If the upload is a feature you need working by Friday and you'd rather not become the person who maintains an image-processing service, a hosted endpoint is the saner trade. Setup lands in the five-minute range Tonta advertises, and the storage limit that eventually matters is on the pricing page rather than a surprise AWS bill.
How do I create a file upload form in HTML?
Put an <input type="file"> inside a <form>, and set two attributes on the form: method="post" and enctype="multipart/form-data". Give the input a name so your server can address the file, add a matching <label>, and add a submit button. Those three attributes (post, multipart, and the file input) are the minimum for a form that actually transmits the file rather than just its name.
What does enctype="multipart/form-data" do?
It tells the browser to package the request so raw file bytes survive the trip. The default encoding (application/x-www-form-urlencoded) is built for short text fields and can't carry binary file contents. Without multipart/form-data on a file form, the server receives the filename as text and none of the actual file, usually with no error to tell you why.
How do I restrict which file types can be uploaded?
Use the accept attribute to filter the picker, for example accept="image/png,image/jpeg,.pdf". But understand that accept is a client-side convenience only; anyone can bypass it. The restriction that counts is on the server, where you check the file's actual bytes (magic numbers), not its extension or its browser-reported MIME type, and reject anything that doesn't match your allowlist.
How do I let users upload more than one file?
Add the multiple attribute to the input: <input type="file" name="docs" multiple>. The picker then allows selecting several files, and your backend receives them as an array under that name, so process them in a loop. If you also want drag-and-drop of a whole folder's worth at once, that's the JavaScript File API layered on top of the same input.
Can I add file upload to my site without a backend?
Not with plain HTML alone; a file input needs something on the other end to receive the bytes. What you can skip is writing that backend yourself. Pointing the form at a hosted upload endpoint (Tonta, Uploadcare, Filestack, and similar) means you add a script tag and the service handles receiving, validating, processing, storing, and serving. You still don't run a server, you just don't write the upload code either.
Where do uploaded files actually get stored?
Wherever your backend puts them. A quick PHP script might drop them in a folder with move_uploaded_file(), which is fine for a prototype but should live outside the public webroot so uploads can't be executed as URLs. Production setups usually push to object storage like S3 and serve through a CDN. With a hosted endpoint, storage and CDN delivery are handled for you and you get back a ready-to-use file URL.
So the short version: the form is easy, and it's fine to feel a little cheated that every "file upload form" tutorial stops right where the actual work begins. Decide honestly which job you're doing. If you want the reps and the control, build the backend and treat the four cards above as your checklist. If you just want files to land somewhere safe, optimized, and fast, without you writing or maintaining any of that, hand the receiving end to something that already does it and get back to the rest of your product.
Wire up an upload and skip the backend.
Grab the free tier, drop the script tag on a page, and have a hardened, image-optimizing upload live in about five minutes. No card, 5GB to play with.